
Resize Image On The Fly Using Lambda At Edge And Cloudfront With S3
简介:通过cloudfront lambda@edge 实现s3 静态图片的动态尺寸调整
背景
静态网站是指全部由HTML(标准通用标记语言的子集)代码格式页面组成的网站,所有的内容包含在网页文件中。网页上也可以出现各种视觉动态效果,如GIF动画、FLASH动画、滚动字幕等,而网站主要是静态化的页面和代码组成,一般文件名均以htm、html、shtml等为后缀。
S3可以提供静态网站服务,同时配合Cloudfront可以提供全球的用户高速访问服务。同时,cloudfront通过 lambda@edge 可以实现分布式的动态内容。
本文以图片处理为例,用户可以通过请求 http://s3.exmaple.com/images/sample.jpg?d=200x400 来实现动态的图片尺寸处理。
S3静态网站
关于启动S3静态网站,已经有很多相关文档,在此简单说下步骤:
- 为静态网站托管配置 Amazon S3 存储桶
- 编辑阻止公有访问设置
- 添加存储桶策略
- 测试您的网站终端节点
Reference: 如何为静态网站托管配置 S3 存储桶?
cloudfront lambda@edge
Lambda是AWS的一种计算服务,运行在AWS的Region内,Lambda@Edge是一个AWS Lambda扩展,可以部署到AWS的CDN服务Cloudfront服务节点上,用于执行函数以自定义CloudFront提供的内容。AWS可以将执行代码部署到AWS全球的Cloudfront节点,而无需预置或管理服务器。Lambda@Edge会自动扩展,从每天几个请求到每秒数千个请求。在与客户端位置较近的AWS Cloudfront节点上(而不是源服务器) 上处理请求,可显著减少延迟并改善用户体验。除了用于在线生成缩略图场景处,Lambda@Edge还可以用于更多的场景,如:
通过为响应添加安全标头,提高用户和内容提供商的安全性。
- 在离用户最近的位置建立Web应用程序。
- 为用户和搜索引擎返回不同的内容,从而优化搜索体验。
- 将不同的用户请求路由到不同的源站点。
- 在边缘位置阻止爬虫和机器人程序进入源站点。
- 将请求导入到不同版本的站点,进行A/B测试。
Lambda@Edge函数执行触发点
- Viewer request:刚从客户端收到请求时触发函数的执行,此时还未检查对象在Cloudfront中的缓存,并且可以从触发的函数中直接返回结果到客户端。此处Cloudfront不会缓存客户端请求的对象。
- Origin request:先执行对缓存对象的检查,如果缓存对象的检查已经存在于Cloudfront中,则此事件不会触发函数的执行。如果请求的对象不在Cloudfront中,则会触发函数执行。可以在执行的函数被直接返回response给客户端,也可以在执行过后,继续转到请求到源端(Origin Server)。
- Origin response:收到来自Origin Server的响应,在将对象缓存到Cloudfront之前,该函数会执行,即使返回了错误,该函数仍然会执行。但如果请求的对象在Cloudfront中,或者是从Origin request生成的response,则此处的函数不会被执行。
- Viewer response:请求在返回到客户端之前,该函数会执行,无论请求的对象是否已经在Cloudfront缓存中,此函数都会被执行,但结果不会被Cloudfront缓存。以下情况中函数不会被执行:
- 当源返回400或更高的HTTP状态码时。
- 当返回自定义错误页面。
- 此响应是在Viewer request中生成的。
- 当Cloudfront将http请求重定向到https请求时。可以根据实际需求,通过以上四个Lambda@Edge函数触发点中的一个或者多个来插入需要的业务逻辑,从而满足不同的业务需求。

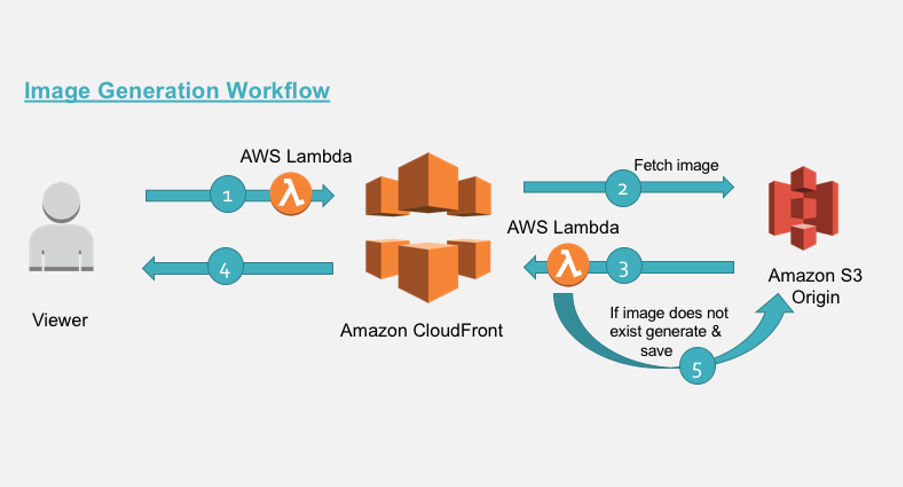
设计
为了实现我们的简单场景,按照用户的请求数据流出,我们基于 lambda@edge 设计了下面的处理过程:
- 用户发起图片请求。对于不带参数的原图请求,lambda@edge采用透传模式。 在此我们讨论用户带有
/images/demo.jpg?d=100x200这样URL参数的请求。对于这样的请求,我们通过lambda@edge进行转换,变成/images/100x200/webp/demo.jpg请求 - 如果在Cloudfront中未缓存该尺寸的图,请求会被转发给源可S3。如果有缓存,则直接返回给用户。
- 如果S3源中没有该尺寸的文件,S3会返回404错误代码给CloudFront。
- Lambda@Edge检查到源的错误响应,进入生成新图片的流程,再返回给用户的同时,将该尺寸的图回传到源S3,确保以后的请求不会再重复计算生成相应尺寸的图片。
- 将响应返回给客户端,同时Cloudfront会自动缓存该图片到缓存中。
实现
CloudFront
创建cloudfront
-
在cloudfront console,点击
create new delivery创建一个新的delivery。cloudfront支持Web资源与流媒体两种CDN,我们选择web。
-
填写基本信息。
origin domain name是源站地址,选择前面公开的s3 静态网站域名。
-
设置分发行为,后期可以更改,我们保留默认值。

-
设置CDN选项。因为是演示,我们还是保留默认值。

最后创建完成一个cloudfront站点。响应的域名可以在这个Delivery 的详情里面找到。
创建lambda
因为cloudfront是全球分布的,所以AWS 规定了 lambda@edeg 必须为在 us-east-1 定义的lambda function.
我们首先在AWS Console右上角切换到 N.Virginia region,然后进入到 lambda 功能console,然后 create function。选择 Node.js 12.x ,填写名字后创建lambda.

lambda执行的时候,需要搭配一个IAM role。 在permission页面可以找到。由于我们需要让cloudfront调用,同时还需要访问S3,所以我们需要对该role进行一些调整。点击role名称进入修改。

首先,增加对S3的访问权限。我们演示为了简单起见,直接添加了 AmazonS3FullAccess 权限

然后,在Trust relationships 里面,添加允许cloudfront 调用该role。

trust relationships 修改为以下内容
{
  "Version": "2012-10-17",
  "Statement": [
    {
      "Effect": "Allow",
      "Principal": {
        "Service": [
          "lambda.amazonaws.com",
          "edgelambda.amazonaws.com"
        ]
      },
      "Action": "sts:AssumeRole"
    }
  ]
}
Lambda@edge
本示例涉及到的代码,已经上传到 Github ,大家可以在 github 下载
代码说明
用户请求
lambda/viewer-request-function/index.js 用于分析用户的原始请求,如果原始请求包含querystring /images/demo.jpg?d=100x200,则对URL进行转换,变为 /images/100x200/webp/demo.jpg ,再由 cloudfront 来进行响应。
'use strict';

const querystring = require('querystring');

// defines the allowed dimensions, default dimensions and how much variance from allowed
// dimension is allowed.

const variables = {
        allowedDimension : [ {w:100,h:100}, {w:200,h:200}, {w:300,h:300}, {w:400,h:400} ],
        defaultDimension : {w:200,h:200},
        variance: 20,
        webpExtension: 'webp'
  };

exports.handler = (event, context, callback) => {
    const request = event.Records[0].cf.request;
    const headers = request.headers;

    // parse the querystrings key-value pairs. In our case it would be d=100x100
    const params = querystring.parse(request.querystring);

    // fetch the uri of original image
    let fwdUri = request.uri;
    console.log(JSON.stringify(event));

    // debug
    //callback(null, request);

    // if there is no dimension attribute, just pass the request
    if(!params.d){
        callback(null, request);
        return;
    }
    // read the dimension parameter value = width x height and split it by 'x'
    const dimensionMatch = params.d.split("x");

    // set the width and height parameters
    let width = dimensionMatch[0];
    let height = dimensionMatch[1];

    // parse the prefix, image name and extension from the uri.
    // In our case /images/image.jpg

    const match = fwdUri.match(/(.*)\/(.*)\.(.*)/);
    //const match = fwdUri.match(/(.*)\.(.*)/);

    let prefix = match[1];
    let imageName = match[2];
    let extension = match[3];

    // define variable to be set to true if requested dimension is allowed.
    let matchFound = false;

    // calculate the acceptable variance. If image dimension is 105 and is within acceptable
    // range, then in our case, the dimension would be corrected to 100.
    let variancePercent = (variables.variance/100);

    for (let dimension of variables.allowedDimension) {
        let minWidth = dimension.w - (dimension.w * variancePercent);
        let maxWidth = dimension.w + (dimension.w * variancePercent);
        if(width >= minWidth && width <= maxWidth){
            width = dimension.w;
            height = dimension.h;
            matchFound = true;
            break;
        }
    }
    // if no match is found from allowed dimension with variance then set to default
    //dimensions.
    if(!matchFound){
        width = variables.defaultDimension.w;
        height = variables.defaultDimension.h;
    }

    // read the accept header to determine if webP is supported.
    let accept = headers['accept']?headers['accept'][0].value:"";

    let url = [];
    // build the new uri to be forwarded upstream
    url.push(prefix);
    url.push(width+"x"+height);

    // check support for webp
    if (accept.includes(variables.webpExtension)) {
        url.push(variables.webpExtension);
    }
    else{
        url.push(extension);
    }
    url.push(imageName+"."+extension);

    fwdUri = url.join("/");

    // final modified url is of format /images/200x200/webp/image.jpg
    request.uri = fwdUri;
    console.log(JSON.stringify(request));
    callback(null, request);
};
S3 回源响应处理
lambda/origin-response-function/index.js 用户处理回源响应。如果回源结果为404(或者目录不存在的情况下,返回403),则由lambda进行进行检查,是否需要生存对应的图片。如果是,则对图片进行处理,将结果存到S3避免以后重复处理,同时将结果返回给用户。
'use strict';

const http = require('http');
const https = require('https');
const querystring = require('querystring');

const AWS = require('aws-sdk');
const S3 = new AWS.S3({
  signatureVersion: 'v4',
});
const Sharp = require('sharp');

// set the S3 and API GW endpoints
const BUCKET = 'your-s3-demo';

exports.handler = (event, context, callback) => {
  let response = event.Records[0].cf.response;

  console.log("Response status code :%s", response.status);
  console.log(JSON.stringify(event));

  //callback(null, response);
  //check if image is not present
  if (response.status == 404 || response.status == 403) { // in case directory not exist
    let request = event.Records[0].cf.request;
    //let params = querystring.parse(request.querystring);

    // if there is no dimension attribute, just pass the response
    //if (!params.d) {
    //  callback(null, response);
    //  return;
    //}

    // read the dimension parameter value = width x height and split it by 'x'
    //let dimensionMatch = params.d.split("x");

    // read the required path. Ex: uri /images/100x100/webp/image.jpg
    let path = request.uri;

    // read the S3 key from the path variable.
    // Ex: path variable /images/100x100/webp/image.jpg
    let key = path.substring(1);

    // parse the prefix, width, height and image name
    // Ex: key=images/200x200/webp/image.jpg
    let prefix, originalKey, match, width, height, requiredFormat, imageName;
    let startIndex;

    try {
      match = key.match(/(.*)\/(\d+)x(\d+)\/(.*)\/(.*)/);
      prefix = match[1];
      width = parseInt(match[2], 10);
      height = parseInt(match[3], 10);

      // correction for jpg required for 'Sharp'
      requiredFormat = match[4] == "jpg" ? "jpeg" : match[4];
      imageName = match[5];
      originalKey = prefix + "/" + imageName;
      console.log(originalKey);
    }
    catch (err) {
      // no prefix exist for image..
      console.log("no prefix present..");
      match = key.match(/(\d+)x(\d+)\/(.*)\/(.*)/);
      width = parseInt(match[1], 10);
      height = parseInt(match[2], 10);

      // correction for jpg required for 'Sharp'
      requiredFormat = match[3] == "jpg" ? "jpeg" : match[3];
      imageName = match[4];
      originalKey = imageName;
      console.log(originalKey);
    }

    // get the source image file
    S3.getObject({ Bucket: BUCKET, Key: originalKey }).promise()
      // perform the resize operation
      .then(data => Sharp(data.Body)
        .resize(width, height)
        .toFormat(requiredFormat)
        .toBuffer()
      )
      .then(buffer => {
        // save the resized object to S3 bucket with appropriate object key.
        S3.putObject({
            Body: buffer,
            Bucket: BUCKET,
            ContentType: 'image/' + requiredFormat,
            CacheControl: 'max-age=31536000',
            Key: key,
            StorageClass: 'STANDARD'
        }).promise()
        // even if there is exception in saving the object we send back the generated
        // image back to viewer below
        .catch(() => { console.log("Exception while writing resized image to bucket")});

        // generate a binary response with resized image
        response.status = 200;
        response.body = buffer.toString('base64');
        response.bodyEncoding = 'base64';
        response.headers['content-type'] = [{ key: 'Content-Type', value: 'image/' + requiredFormat }];
	console.log(JSON.stringify(response));
        callback(null, response);
      })
    .catch( err => {
      console.log("Exception while reading source image :%j",err);
    });
  } // end of if block checking response statusCode
  else {
    // allow the response to pass through
    callback(null, response);
  }
};
构建及上传发布
基于上面的git repo,我们可以通过docker的方式build代码并打包成zip包上传到AWS。
# 安装docker
sudo apt-get install -y docker.io

# build nodejs docker打包环境
sudo docker build --tag amazonlinux:nodejs .

# 运行build,安装下载相应的软件环境
sudo docker run --rm --volume ${PWD}/lambda/origin-response-function:/build amazonlinux:nodejs /bin/bash -c "source ~/.bashrc; npm init -f -y; npm install sharp --save; npm install querystring --save; npm install --only=prod"
sudo docker run --rm --volume ${PWD}/lambda/viewer-request-function:/build amazonlinux:nodejs /bin/bash -c "source ~/.bashrc; npm init -f -y; npm install querystring --save; npm install --only=prod"

# 结果打包成本地zip包
rm dist/*.zip
mkdir -p dist && cd lambda/origin-response-function && zip -FS -q -r ../../dist/origin-response-function.zip * && cd ../..
mkdir -p dist && cd lambda/viewer-request-function && zip -FS -q -r ../../dist/viewer-request-function.zip * && cd ../..

# 通过aws cli上传代码到AWS。 也可以通过console进行。
aws --region us-east-1 lambda update-function-code --function-name kujiale_demo_cf_url_reform --zip-file fileb://dist/viewer-request-function.zip
aws --region us-east-1 lambda update-function-code --function-name kujiale_demo_cf_404_handler --zip-file fileb://dist/origin-response-function.zip
成功后,会变成对应lambda函数的 $LATEST 版本,必须通过发布 功能生成线上版本、生效。
测试验证
对于刚刚上传的 $LATEST 版本,我们可以通过 测试 功能来进行测试验证。
构建测试内容
用于 viewer request 的测试数据
{
  "Records": [
    {
      "cf": {
        "config": {
          "distributionDomainName": "idofcloudfront.cloudfront.net",
          "distributionId": "distributionid",
          "eventType": "viewer-request",
          "requestId": "requirestid"
        },
        "request": {
          "clientIp": "1.2.3.4",
          "headers": {
            "host": [
              {
                "key": "Host",
                "value": "idofcloudfront.cloudfront.net"
              }
            ],
            "user-agent": [
              {
                "key": "User-Agent",
                "value": "Mozilla/5.0 (Macintosh; Intel Mac OS X 10_15_6) AppleWebKit/537.36 (KHTML, like Gecko) Chrome/85.0.4183.83 Safari/537.36"
              }
            ],
            "pragma": [
              {
                "key": "Pragma",
                "value": "no-cache"
              }
            ],
            "cache-control": [
              {
                "key": "Cache-Control",
                "value": "no-cache"
              }
            ],
            "accept": [
              {
                "key": "Accept",
                "value": "text/html,application/xhtml+xml,application/xml;q=0.9,image/avif,image/webp,image/apng,*/*;q=0.8,application/signed-exchange;v=b3;q=0.9"
              }
            ],
            "accept-encoding": [
              {
                "key": "Accept-Encoding",
                "value": "gzip, deflate"
              }
            ],
            "accept-language": [
              {
                "key": "Accept-Language",
                "value": "en-US,en;q=0.9"
              }
            ]
          },
          "method": "GET",
          "querystring": "d=100x200",
          "uri": "/images/aws.png"
        }
      }
    }
  ]
}
用于 Origin Response 的测试数据
{
  "Records": [
    {
      "cf": {
        "config": {
          "distributionDomainName": "idforcloudfront.cloudfront.net",
          "distributionId": "distribution",
          "eventType": "origin-response",
          "requestId": "requestid"
        },
        "request": {
          "clientIp": "1.2.3.4",
          "headers": {
            "x-forwarded-for": [
              {
                "key": "X-Forwarded-For",
                "value": "1.2.3.4"
              }
            ],
            "user-agent": [
              {
                "key": "User-Agent",
                "value": "Amazon CloudFront"
              }
            ],
            "via": [
              {
                "key": "Via",
                "value": "1.1 uuid.cloudfront.net (CloudFront)"
              }
            ],
            "pragma": [
              {
                "key": "Pragma",
                "value": "no-cache"
              }
            ],
            "accept-encoding": [
              {
                "key": "Accept-Encoding",
                "value": "gzip"
              }
            ],
            "host": [
              {
                "key": "Host",
                "value": "demo.s3.amazonaws.com"
              }
            ],
            "cache-control": [
              {
                "key": "Cache-Control",
                "value": "no-cache"
              }
            ]
          },
          "method": "GET",
          "origin": {
            "s3": {
              "authMethod": "origin-access-identity",
              "customHeaders": {},
              "domainName": "demo.s3.amazonaws.com",
              "path": "",
              "region": "us-east-1"
            }
          },
          "querystring": "",
          "uri": "/images/100x100/webp/aws.png"
        },
        "response": {
          "headers": {
            "x-amz-request-id": [
              {
                "key": "x-amz-request-id",
                "value": "request-id"
              }
            ],
            "x-amz-id-2": [
              {
                "key": "x-amz-id-2",
                "value": "request-id2"
              }
            ],
            "date": [
              {
                "key": "Date",
                "value": "Fri, 11 Sep 2020 00:00:00 GMT"
              }
            ],
            "server": [
              {
                "key": "Server",
                "value": "AmazonS3"
              }
            ],
            "content-type": [
              {
                "key": "Content-Type",
                "value": "application/xml"
              }
            ],
            "transfer-encoding": [
              {
                "key": "Transfer-Encoding",
                "value": "chunked"
              }
            ]
          },
          "status": "404",
          "statusDescription": "Not Found"
        }
      }
    }
  ]
}
测试成功后,需要做一次生产发布,将 $LATEST 版本 发布 上版、生效。
启用lambda
Cloudfront 以及 lambda 都就位后,我们在cloudfront的 behavior 页面,修改并启用相应的功能。如图:

如下图, 添加 Viewer Request 以及 Origin Response 两个handler,注意,指定的 lambda@edge 必须位于 us-east-1 region,同时,ARN必须指定版本号。为 function_name:version 格式。

配置完成后,等待cloudfront 更新配置,几分钟后,配置生效,即可验证。
我们通过访问提前准备好的图片,通过 cloudfront 提供的CDN域名进行访问,添加?d=100x200 进行验证。如 http://hh.cloudfront.net/images/aws.png?d=100x200。
其他
log
log是监控、调试必不可少的环节。默认的cloudfront log不是实时的。一般会有几分钟的延迟。如果要开启cloudfront的日志,只需在 logs看板,指定存放日志的s3 bucket,然后开启logs即可。如下图:
cloudfront logs 控制台

配置cloudfront 启用 logs

cloudfront log 的格式
#Version: 1.0
#Fields: date time x-edge-location sc-bytes c-ip cs-method cs(Host) cs-uri-stem sc-status cs(Referer) cs(User-Agent) cs-uri-query cs(Cookie) x-edge-result-type x-edge-request-id x-host-header cs-protocol cs-bytes time-taken x-forwarded-for ssl-protocol ssl-cipher x-edge-response-result-type cs-protocol-version fle-status fle-encrypted-fields c-port time-to-first-byte x-edge-detailed-result-type sc-content-type sc-content-len sc-range-start sc-range-end
2020-09-11	05:05:18	NRT57-C3	1354	1.2.3.4	GET	hh.cloudfront.net	/images/aws.png	502	-	Mozilla/5.0%20(Macintosh;%20Intel%20Mac%20OS%20X%2010_15_6)%20AppleWebKit/537.36%20(KHTML,%20like%20Gecko)%20Chrome/85.0.4183.83%20Safari/537.36	d=100x200	-	LambdaValidationError	-requestid==	hh.cloudfront.net	http	519	2.456	-	-	-	LambdaValidationError	HTTP/1.1	-	-	63363	2.455	LambdaValidationError	text/html	985	-	-
realtime log
某些场景(比如调试、实时处理等),我们期望有秒级日志。这种情况下,cloudfront可以将日志实时传入到kinesis stream供进一步处理。我们这里简化处理,通过kinesis firehouse直接将日志存到s3。
首先,创建一个 kinesis stream,如图,直接新建即可

然后,创建一个 cloudfront real-time log configuration。输出选择刚才新建的kinesis stream。

为了将实时日志存储到 s3,我们再创建一个 kinesis firehouse 将日志转存到 s3:
-
创建firehouse,注意
source选择kinesis stream
-
配置firehouse 参数,保持默认即可

-
配置数据处理方式,我们不需要对数据进行任何处理,再次选择默认值

-
配置目标,选择S3,并选择对应的目标bucket

更新cloudfront启动新版本
lambda@edge log
由于cloudfront天然的分布性,lambda@edge的日志没有集中存储,而是分布在离执行地最近的region。具体再哪儿,可以根据你所在的地区进行推算,也可以通过cloudfront的访问日志,获取接入点的城市代码(一般为国际航空运输协会IATA定义的城市三字码)从而推测最近的region。
在对应region的cloudwatch中,可以找到 /aws/lambda/us-east-1.lambda_function_name 的log groups 即为lambda@edge的执行日志
价格
lambda@edge 价格同 lambda ,按请求次数和函数内存量与执行时长收费,以美国东部为例:
- 每百万次请求 $0.20
- 执行资源与时长 $0.06/GB-hour,精确度到100ms
AWS 每月提供了一些免费额度,可以满足测试需求:
- 1,000,000 requests
- 400,000 GB-seconds